
Over time I've seen many crafts put together for seniors. They usually consist of pipe cleaners, feathers, decoupage, construction paper and other child like ingredients all pulled together to create something that will very soon be thrown away! I do admit that at times some of my crafts may require a little more assistance then others, however, everyone has been successful in creating and finishing a very attractive craft that they are proud to own and display.
It's my hope that you will find some of my crafts to be helpful, inspirational and at times economical.
_________________________________________
Canvas Tree Totes


It's my hope that you will find some of my crafts to be helpful, inspirational and at times economical.
_________________________________________
Canvas Tree Totes
Okay... I always say, "this craft was a lot of fun".
But really... This Craft was A LOT of fun!
I purchased the totes at Michael's Craft store for $1.00 each and the permanent fabric glue I purchased there as well. The fabric was free as I collected the scraps from our quilters. The only part of the project that was a slight challenge was the tree stencil. I am in NO WAY an artist. I'm crafty but NOT an artist. I drew out a tree on a heavy piece of cardboard. Then I cut it out and surprisingly on my first try it looked pretty good. My sweet husband then took all the totes outside and with brown spray paint he sprayed each bag with the stencil. He did 30 bags and we used 4 cans of $1.00 paint from Home Depot.


Make sure you have a lot of sharp scissors!
in case you forgot... Dollar Tree is great for scissors and other craft ideas & supplies.
__________________________________________________________
Got Buttons?

This idea came from having an abundance of buttons on hand. As I always do, I use the search bar in Google to get my inspirations. I will (in this case) type in the key word "Button Crafts" then I will click on IMAGES. This will give me visuals of many items made with buttons. Then when I see a craft that looks interesting I will widen the search to that particular item. For example; "Button Bouquet", then I may try "Button Flowers". Each search will produce different ideas and examples. When I first tried this Button Craft I used the small pots as shown above. I had several of them already and I also had the grass & green floral foam to push the wire into. It really turned out great, however, later I tried the salt shakers and they were much easier with less work and mess.

The salt and pepper shakers were only $1 each at Walmart. I added salt to them in order to help arrange the wires and hold them in place. I also added felt flowers occasionally between the buttons as I had several pre-cut pieces already on hand. The wire was very inexpensive and can be purchased in any floral department. Buttons on their own can usually be collected by your residents as were ours. If that is not an option, any craft store will have those as well.

So to sum it up... You will need...
Floral wire (try to get the lightest and thinnest as it will be easier to twist)
Buttons
Salt Shakers (salt is optional)
Wire Cutters
Other Options are... ribbon for tying around the top of the shakers when finished
felt flowers or flower hole punches for accents between the buttons
(as seen in the first two pictures)
For step by step instructions I found THIS SITE to be very helpful
_________________________________________________________________________
Bright, Colorful & Tasty Topiary Trees

What you will need for this craft...
- foam balls
- pots
- florist foam for pots
- green grass
- straws (optional)
- large skewers
- ribbon
- Dum Dum suckers
- floral pins or wire
Prep work you may consider doing...
- breaking the suckers off just below the neck (you must leave enough stick to push into the foam).
- pre-cut your ribbon
- place the floral foam in the base of the pot
- some skewers may be too long and will need to be cut.
__________________________________________________
Tweet Little Notepad Box

This craft was one of my many Stamp'n Up projects. I first purchased the wooden box, ribbon, notepad and pencils at Michael's for $1 each (pencils came in a pack of 6). The paint was applied days prior to assembling the craft and only on the top and bottom of box.
All the paper cutouts were pre-cut for me by Leah Sinatra at http://www.papercutswithleah.blogspot.com/ All items on her blog can be purchased and prepre-cut pieces are separated into bags to be handed out to each crafter.
The only other items needed for this craft are double stick tape and a couple dots of foam tape. Adding the 3-D dimension with the foam tape really adds the finishing touches on making this craft look extra special. We added to the back of the bird and it can also be added to the roof if you like.
Side Note... The bird theme was chosen because I found the bird notepads. You can choose any theme or change your decorations to suit whatever notions you may already have. Paper can also be cut to fit in the box instead of notepads or you can use the box for pens/pencils/scissors or whatever else you can think of!
_________________________________________________________________________

FESTIVE CANDY TINS
This craft was a lot of fun and a great item to make for gift giving.
I purchased the tins at Papertrey,Inc.
I also purchased the pre-cut paper and ribbon from PaperCuts
The Hershey's Chocolate candy was purchased at Sam's Club.
You will need double stick tape and depending on your embellishments you may also need some foam tape.
We found that two swift curls of the paper that will be wrapped around each chocolate will help them fit more snug around the chocolate pieces and taping will be a bit easier. We used pencils and curled it much like you would with curling ribbon and scissors.
The paper strips are cut to fit around the chocolate pieces and taped with double stick tape.
The paper band that goes around the tin is NOT taped to the tin. Tape both ends together so it can easily slip off the tin.


This craft was so popular that we've made it a couple times.
Every time we have a huge turnout.
Use your imagination and come up with your own theme. Remember to keep it simple. The smaller the pieces the more assistance that will be needed.
_____________________________________________
Orange you Happy for the Holidays!

This was one of our easiest and most fun craft. It was also extremely inexpensive.
You will need:
- Oranges
- cloves (they are most inexpensive if purchased in the bags down the grocery store isle where the Hispanic foods and spices are sold.
- Ribbon
Optional items you can have on hand are:
- Toothpicks (to pre-poke the holes if you have seniors with sensitive fingers)
- clear plastic gift giving bags for wrapping up the finished product. Remember to add a bit of raffia or colored grass to the bottom, a ribbon around the top and maybe even a green sprig from a tree or a cinnamon stick tied around the top. It's a great gift that brings the smell of the Holidays to your home.
Because I knew so many residents were going to be showing up for this craft and wanting to
make more than one... we pre-made up some oranges with the ribbon.
Not all oranges need to have ribbon on them.

The finished product was Amazing!
FYI... The oranges will shrink up over time. This only adds to the potpourri appearance.
If you would like to purchase Cinnamon sticks (these can also be purchased cheaper in the Hispanic foods isle), you can add them to the top of the orange by just sliding them under the ribbon.

Below are the packages of Cinnamon Sticks that I purchased at a local Dollar Tree and Cloves that were purchased at our local grocery store for $1.39

___________________________________________________________________
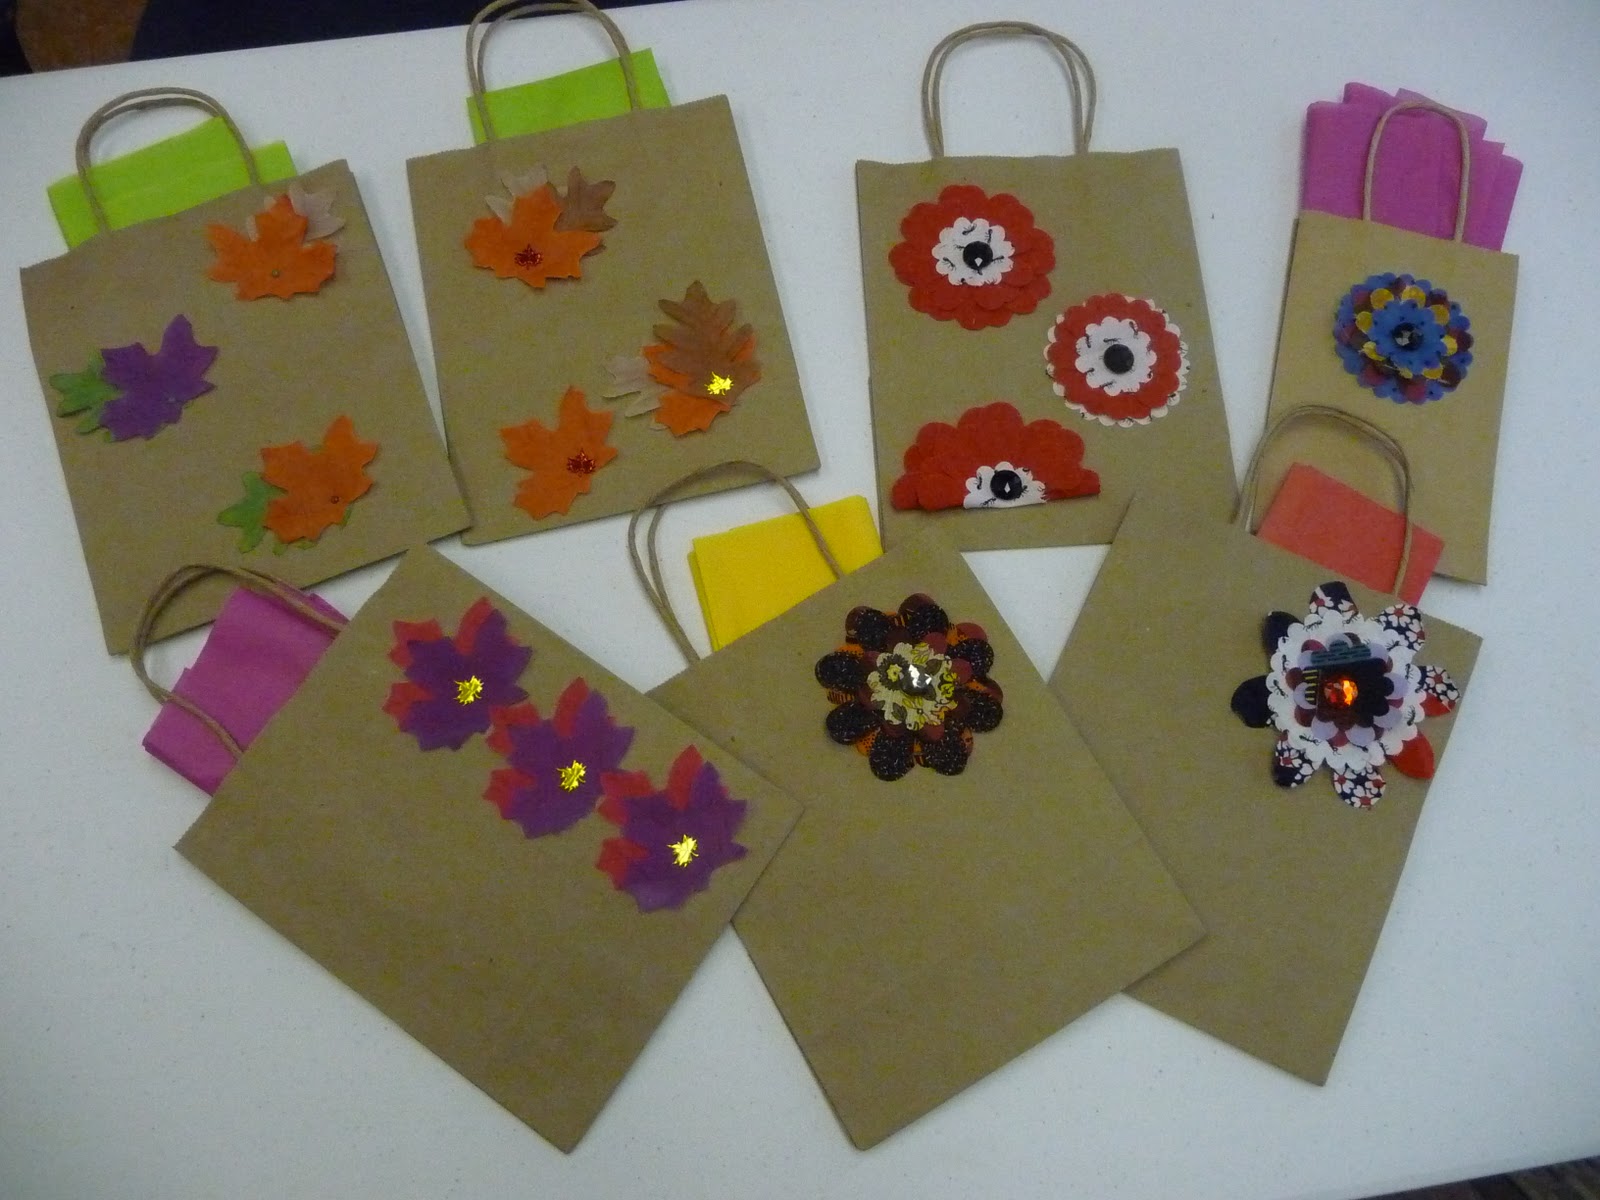
It's in the BAG!

This craft I thought was going to be quick, easy and over in no time. I couldn't be more wrong. We had so many flower colors, pedals & sizes, brads and leaves to choose from that the ladies couldn't decide. Everyone made more than one craft bag and we were all there for over an hour.
What you will need:
- gift bags were purchased from Michael's in bulk. They averaged .50 a bag.
- brads were purchased from Michael's for $2.99 for 12 large jewels.
- leaves were purchased from Dollar Tree, however, I later saw them at Micheal's.
- the fabric was collected from our residents as scraps & leftovers from our quilting group.
- the machine that cut the flower pedals out was a Big Shot Die-Cut Machine from Stampin Up
Okay, here is where you are going to either fall in love or laugh at me and think to yourself....
ya whatever!
The Big Shot Die-Cut Machine is so Awesome and you will be able to use it for so many things but it is a bit expensive. Because it will be an investment for your department, I'm going to set up a few links here for you to check it out and see all that it's capable of.
- Google Images - This will show you some projects that can be made with the "Big Shot"
- You Tube - This will show you a demonstration on all the "Big Shot" die-cuts
- Order - With Stampin Up Demonstrator Leah Sinatra, who supplies us with all our pre-cut crafts.
Now if you're totally out on the Big Shot machine, let me encourage you with this... Only an hour at any craft store and a bit of imagination, you'll find plenty of things to decorate your gift bags.

Spritz of Spring

This floral craft was a bit more involved than some other crafts we've done, however, it was one of the biggest hits we've had.
Since I didn't take pictures of all the prep, I'm going to do my best to explain each step that was involved.
- I got the baskets for $1each at Micheal's Craft Store. (The dollar bins at Target may have items that can be used for floral arranging as well.) Be flexible on your container.
- Purchase your Oasis (floral foam for Live arrangements) at any craft store. This is a good item to use your 50% off any one item in the weekly Micheal's advertisement flyer.
- If you're using a basket, you'll need to insert a small cup or container to hold the Oasis.
- I soaked the Oasis for at least an hour before the craft. You'll need a sharp knife to cut the Oasis to fit the container. Cut it larger than needed and push it down into the container for a tight fit.
Here's where the flowers and greens come in. We have a local florist that has 50% off cash and carry stems on Fridays. Check with your local florist or grocery stores for deals. I purchased enough flowers so each basket had 5 flowers. There are all kinds of greens. Just purchase the cheapest if money is an issue. It all looks good in the end. I pre-cut all the flowers and stems so that each person had their 5 flowers and I put all the greens in the middle of the table. Do what works best for you. We had about 35 seniors at this craft. The flowers and greens cost me $40. Have scissors on the tables and if you want to take it further... look for items to stick in the floral arrangement. Ribbons, Drink stirrers with umbrellas or decorations on them or even cupcake decorations that are affixed to toothpicks... use your imagination!
Be sure to remind your Crafters to water their flowers and have a
Blooming Great Time!


_____________________________________________________________________________________
Beaded Bookmarks
~~~~~~~~~~~~~~~~~~~~~~~~~~~~~~~~~~
This craft is right on the money.
No need to break the bank for this one.
~String or lightweight rope
~Beads
~Bags (optional)
~Bag Toppers (optional)
THAT'S ALL FOLKS!
I purchased everything at Walmart. The bags are in the bead isle or sometimes found in the cake isle.
The toppers are printed from a Google Image I found and cut and folded to make each
book mark presentable for gift giving.


~~~~~~~~~~~~~~~~~~~~~~~~~~~~~~~~~~~~~~~~~~~~~~~~~~~~~~
~~~~~~~~~~~~~~~~~~~~~~~~~~~~~~~~~~~~~~~~~~~~~~~~~~~~~~~~~~~~~~~~~

~~~~~~~~~~~~~~~~~~~~~~~~~~~~~~~~~~~~~~~~~~~~~~~~~~~~~~~~~~~~~~~~~
THE NOTEBOOK
this one had all the right qualifications:
super easy
super quick
super cheap
super cute
I purchased the notebooks in the dollar bins at Micheal's
I purchased a large $20.00 book of paper at Micheal's but used my 40% coupon
(I'll be able to use this for many crafts to come)
ribbon we already had and paper punch the shape of a flower we already had.
plain white brads were purchased at Michel's
double stick tape
As always I pre-cut the paper, ribbon & flowers. I put it all together with the tape and brad into a zip lock and place it with one book at each setting.
Yay!!! Another great time was had by all!


~~~~~~~~~~~~~~~~~~~~~~~~~~~~~~~~~~~~~~~~~~~~~~~~~~~~~~~~~
FLOWER PEN ARRANGEMENTS
This craft I would say was a bit more challenging. A little more preparation was needed as well, however, the outcome was great and everyone loved making these. I would say it is well worth the efforts.
You will need:
Pens, florist tape, flowers, greens, vases, small decor stones or marbles & wire cutters

 |
| If you use the round jar vases as seen in the bottom of this photo, you will need the small stones or marbles for a better looking arrangement and it also holds the pens in a better position. |
I had each resident pick out approx. two flowers and one green per pen. Then they used the floral tape to wrap and adhere them to the pen. You will very quickly find out the best way to instruct this craft just by making your example ahead of time!
Everything used for this craft was purchased at the dollar store.
Most of our vases we had on hand... we never seem to throw anything away.
I know you can purchase vases cheaper than a dollar at Goodwill.


~~~~~~~~~~~~~~~~~~~~~~~~~~~~~~~~~~~~~~~~~~~~~~~~~~~~~~~~~~~~~

******************************************************
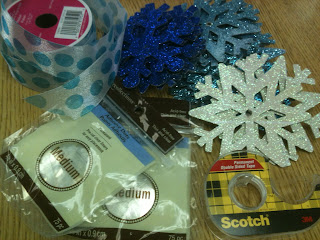
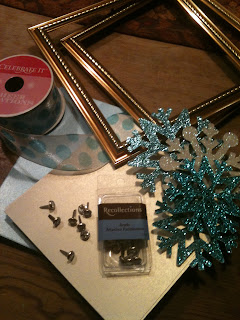
It's a BLUE Christmas
Decorative Hand Soap & Matching Picture
Great for sprucing up the guest bath or kitchen!
 I would highly recommend this craft. I would actually highly recommend the hand soap and only recommend the framed art!
It was a bit of work to put it all together but in the end it was really worth it. Everyone loved it and many people made extra hand soaps for gifts.
So here's the run down...


Quick and Easy Candy Bar Craft
This will work with just about any candy bar or boxed candy.
Just pick out some cute paper
Cut it to wrap around the candy bar or boxed candy
double stick tape it
Tie a ribbon around it
Top it off with an embellishment
IT'S THAT EASY!
This craft looks best if you have two or three candy bars stacked together or one of the larger boxes of Dots, Junior Mints or Hot Tamales, etc..

******************************************************
It's a BLUE Christmas
Decorative Hand Soap & Matching Picture
Great for sprucing up the guest bath or kitchen!

It was a bit of work to put it all together but in the end it was really worth it. Everyone loved it and many people made extra hand soaps for gifts.
So here's the run down...
I purchased the hand soap and hand sanitizers at the dollar store.
I liked the soap because it was blue, however, i was unable to purchase as many as i needed so i substituted the hand sanitizer. These came with clear labels on them and I actually pealed them off and had to use some goo gone to eliminate some of the glue residue. That wasn't much fun!
The frames where also purchased at the dollar store. These were taken apart and spray painted glossy white. I only used the frame and discarded the glass (of course i saved it in order to find a use for it in the future).
I went to Micheal's and purchased a pearl white paper and a pearl blue paper and cut them accordingly to size.
I also purchased the brads, ribbon and snowflakes at Micheal's.
The only real bit of advise is to use the 3D adhesive dots for adhering the snowflakes to the bottles and the framed art.
I also would advise you to use a pick device to pre-punch the holes in the snowflakes. I believe pictures are the best way to figure this one out so I'm posting several of them.


***************************************************************
CHRISTMAS TREE
What you're going to need:
Christmas Paper (not card stock) I believe I cut these 1"x3" and there were 120 strips per tree... approx.
Styro Tree (dollar store)
Terracotta water catcher
Stars (cake decorating isle, stars on toothpicks)
Pins (1/2" works best)
Paint (for the terracotta bases)
I painted them glossy and hated it so i went over it with a gold craft paint i had in a bottle
and just wiped it on and off.
Glue gun to glue the tree to the stand. I did this before they even started the craft.
Start at the bottom and work your way up. Once again this is a craft that is best figured out as you make your example craft for the ladies to see ahead of time. I used two extra strips of paper to cover the tip of the tree just before I put on the last row. I pined them in place with the last loops and placed the star of top!
 | ||
| I hated the glossy bottom... I hope you do a better job on this than I did! |
I also didn't much like the blue and white tree... stick with colorful Christmas Trees


*****************************************************************************
Valentines Day Craft Candy

This craft was not too difficult, however, there's a lot of prep.
The boxes of Sweetheart candy can be found everywhere durring Valentines Season.
I got my paper from Michael's Craft Store.
The white paper is card stock. I used a score board from Stamp'n up.
It really comes in help when making the case form for the candy.

I appologize for not remembering the measurements on this craft. PLEASE be sure to make one ahead of time to figure all that out before you're in front of your crafters! You probably think I'm stupid for even saying that but yes I have done that before!
YOU WILL NEED:
double stick tape
scissors
embelishments (i used hearts & clothes pins)
foam tape for the 3D effect
ribbon
hole puncher
 |
| I uesed two ribbons here, however, one ribbon would be better. It's important to know that you thread you ribbon streight accross both holes at the top of your case then you push the candy down on top of the ribbon. Tie the ribbon at the top... when you untie the ribbon and pull up on it... the candy will rise up out of the case. Very cute and cleaver. |
___________________________________________________________________
I got this right off of Pinterest... I can not lie!
I purchased the small salt and pepper shakers from MICHEAL'S Craft store for only $1.00 a pair.
The straight pins were purchased there as well. The only thing I would have done different is purchase corsage pins. They would have been longer and had a larger pearl head.
I purchased the pearls at Walmart and counted enough for each shaker to have approx. 20 pearls.
You can use any paper. Try using newspaper, craft paper, leftover greeting cards or anything you have laying around. I used a flower paper punch from stamp'n up and I would pinch the petals to give them a 3-D effect..
Tiny Little Flowers
I got this right off of Pinterest... I can not lie!
Such a cute little idea with a BIG presence.
I purchased the small salt and pepper shakers from MICHEAL'S Craft store for only $1.00 a pair.
The straight pins were purchased there as well. The only thing I would have done different is purchase corsage pins. They would have been longer and had a larger pearl head.
I purchased the pearls at Walmart and counted enough for each shaker to have approx. 20 pearls.
You can use any paper. Try using newspaper, craft paper, leftover greeting cards or anything you have laying around. I used a flower paper punch from stamp'n up and I would pinch the petals to give them a 3-D effect..
As always... practice making one first before you try it out in front of your residents.
I'm always glad I did!


<<<<<<<<<<<<<<<<<<<<<<<<<<>>>>>>>>>>>>>>>>>>>>>>>>>
THANKSGIVING

This craft took quite a bit of prep.
I purchased the shadowboxes at the dollar store for.... yup, $1 ea.
(It doesn't look like it but I did paint these, maybe I should've went a shade darker)
The ribbon was purchased at Walmart
I used the computer to make all the letters. I was creative with the colors and backgrounds. I used paper punches that were purchased at the craft store (we already had them on hand). the paper squares that you see in the backdrop of each section were cut out with a paper cutter.
I used foam tape and double stick tape. This way I was able to put some squares and letters flat and others lifted off the page. I also added a couple flowers and or buttons to the empty squares. Another great 3-D effect that brings this craft into extraordinary!


~~~~~~~~~~~~~~~~~~~~~~~~~~~~~~~~~~~~~~~~~~~~~~~~~~~~~~~~~~~~~~~~~~~~
Birdhouse Craft

This little cutie is something I created from being in the right place at the right time.
Because I also run the gift shop at Fellowship Square, I often come across closeout items at huge savings.
I was able to get these adorable birdhouses for only $1.50 each. They have a super cute copper roof.
I was able to find the rest of the inspiration at Hobby Lobby.
Wire, beads, small birds, tiny nests, embellishments and a cute Welcome sign that i printed on card stock.
~~~~~~~~~~~~~~~~~~~~~~~~~~~~~~~~~~~~~~~~~~~~~~~
Christmas Cardinal Craft

This is another great wholesale bargain I got. The glass votive holder was only $1.50 on clearance.
I wrapped twine around the top. Then I wrapped beaded wire around the twine. Then add a sprig of tree branch. Paper nest, Cardinal and all my embellishments were found at Hobby Lobby.
When Christmas is over... take off the decorations and use it as a votive holder, make-up brushes or pencil holder. The ideas are endless! Good Luck and Happy Crafting!
~~~~~~~~~~~~~~~~~~~~~~~~~~~~~~~~~~~~~~~~~~~~~~~~~~~~~~
Sweet Corn on the Cupcake?
This was a really fun craft. We ordered cupcakes from Costco (with no frosting)
Purchased yellow jelly belly's from WinCo bulk section.
Betty Crocker white frosting (store bought frosting was a little too thin. A thicker frosting would work better for this craft). The corn holders and trays I found in the dollar section of Target. Stroke of good luck! As it turned out those things are actually hard to find and my craft almost didn't happen.
We used yellow Starburst for the pad of butter.
It all added up to a Great Time!

